This is a continuation post covering a process to setup DMARC on active domains. Visit A (sane) DMARC setup process for busy email domains to know more about this post series.
Planning and controlling the DMARC deployment process is crucial to avoid problems and questions down the road that you won’t have answers for.
As they say, by failing to plan, you are preparing to fail.
So before you start changing DNS records to analyze DMARC data, you need to do two things to support the deployment:
Set up a worksheet to gather information about the domain, and help you control the process; and
Change the domain to a baseline configuration.
Set up a worksheet to help you with the DMARC setup process
You need to arrange a way to document and control the process. You don’t need anything fancy. Keep it simple. A simple spreadsheet is all you need. A calendar application (such as Google Calendar) can be helpful too, to add reminders so you can go check the domain after making changes to it.
In the spreadsheet, you need at least the following information:
- The domain name
- List of sender hosts - name, IP, DKIM selectors
- The dates when each stage of the deployment process begins and ends
- Any other notes you find useful
To save time, we have created template worksheets that you can use for that purpose. You can duplicate sheets in the file, and use it to control deployment of DMARC on many domains at the same time.
You can download the files for free in Excel or OpenDocument format;
After you have your worksheet set up, you should update it with the following information:
Domain name
All known sender servers (name and IP addresses) and DKIM selectors
The start and end date of each stage of the DMARC setup process
If you’re using the worksheets provided above, you don’t need to worry about date calculations. Just input the length of your emailing cycle, your process start date, and the worksheet will calculate all the other dates. You can override those dates later, if needed.
Baseline configuration
Updating the domain to a baseline configuration will ensure that any missing SPF, DKIM, or DMARC DNS records are set up in a way to allow you to collect DMARC reports, and not impact current email deliverability in any way.
You should also change TTL values for SPF, DKIM, and DMARC records to small values. This will allow changes to be applied more quickly, which is useful during DMARC deployment. Please be a good netizen, don’t go overboard by using sub-minutes TTL. A 10 minutes (600 seconds) TTL is just fine, and prevents overwhelming DNS servers with repeated queries. You will revert TTL to longer values at later stages of the DMARC setup process.
Here is this stage checklist:
Set SPF, all DKIM selector, and DMARC record’s TTL to a small value (i.e. 600 seconds).
Set up a neutral or soft-fail SPF record. A good starting point is a record that looks like this:
v=spf1 ?allYou can skip this step if the domain already has a SPF record.
Set up DKIM on your email providers and servers. Make sure you put DKIM records in test mode by adding a
t=ytag to them.You can skip this step on existing DKIM selectors and servers.
Change the DMARC policy to
p=none.
That’s it. This is the end of Stage 1 – Prepare.
Once you do all the above, you’ll be ready to move on to the next stage.
Preparing Example Inc
To begin with the 5-Stage DMARC Setup on example.com the first step we take is to prepare the tools and a worksheet to control the process.
We create an account on DMARCPal, and make sure that the domain is connected so we can get DMARC reports. We will also use DMARCPal to ensure that SPF, DKIM, and DMARC DNS records are always in compliance.
Connecting to DMARCPal is easy — we just add the suggested DMARC record to the domain’s DNS and wait. A few minutes later we get an email saying that the update has been detected, and the domain is connected.
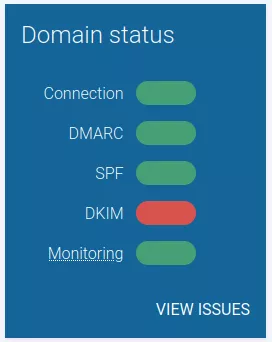
As the next step we run the Domain Health Check manually. Here we want to make sure that all DNS records are properly set up and valid. After running the tool, we see by the red sign that DKIM has some issues.
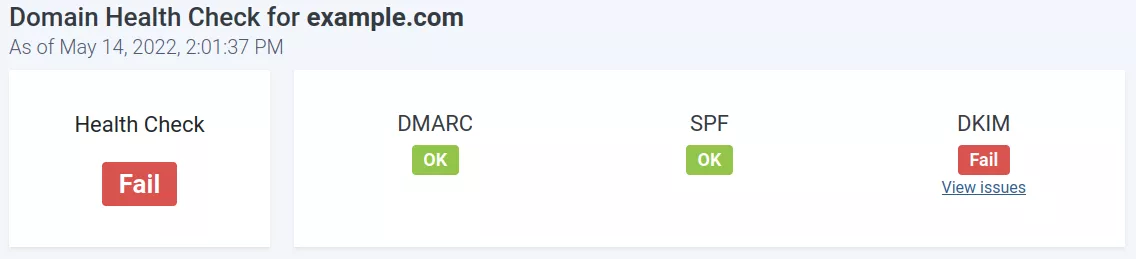
By checking the DKIM issue list we see that most failed checks are due to non-existing DKIM selectors. That could be caused by a lot of things, but we’re not jumping to any conclusions yet — the goal here is just to enable the domain for setting up DMARC. We will get insights during the 5-Stages DMARC Setup process, so let’s not waste time changing things we don’t know yet if they’re broken.
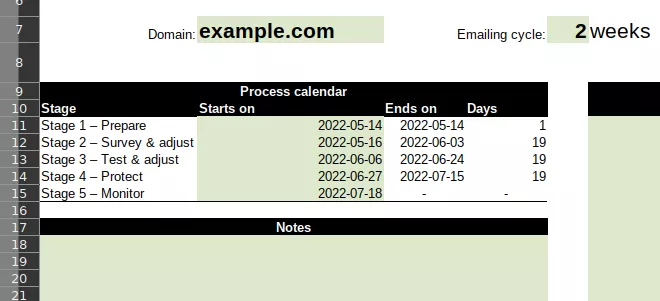
After setting up Example Inc.’s account on DMARCPal, we prepare the worksheet we will use to control the process. We use the template provided by DMARCPal (see above). After downloading the file, we set the emailing cycle and the dates that each stage should tentatively start and end. We only set the starting date, all other dates are calculated automatically.
The worksheet gives us a good idea about when to expect the domain to be fully protected.
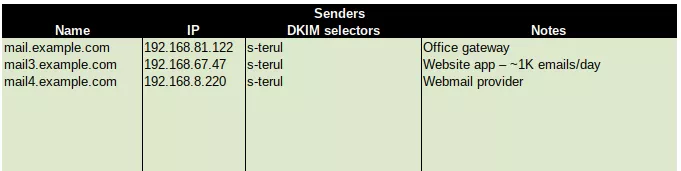
We also update the list of known senders, based on information we gathered from the IT and marketing staff. Known DKIM selectors are updated as well.
Notice that, at this point we’re not worried whether our worksheet is 100% accurate. All we need is a global view of the email system so that we are sure that our initial DNS records are set up properly. The worksheet will become more and more accurate as we update it with information we receive from DMARC reports.
After collecting all known sender addresses and DKIM selector, we go back to the DNS host to set up records for Stage 2. As we said earlier, Example Inc. already has a SPF record, so all we do is review the SPF records to make sure that all known senders are listed, and that all known DKIM selectors are present.
This is how their SPF record looked like after all the changes:
v=spf1 ip4:192.168.81.122 ip4:192.168.67.47 ip4:192.168.8.220 ?allWe do not change any existing DKIM records. We also double-check the DMARC record to make sure the policy is open. What we want to see is a p=none tag, indicating that DMARC reports would still be generated, but no policy should be applied to emails that do not pass DMARC.
The final DMARC record looks similar to this:
v=DMARC1;p=none;rua=mailto:a-0-0-xyz@in.dmarcpal.comLastly, we make sure that the SPF record, all existing DKIM selector records, and the DMARC record have a small TTL value. We find that a 10 minutes (600 seconds) TTL is more than enough, and we set up the records with that value.
At this point, we’re ready to start the second stage of the DMARC setup process — survey & adjust.