This is a continuation post covering a process to setup DMARC on active domains. Visit A (sane) DMARC setup process for busy email domains to know more about this post series.
In the previous steps of the 5-Stages DMARC Setup process we got to know more about the domain email traffic patterns. We did that so we could identify senders, and adjust domain SPF, DKIM, and DMARC records.
In the fourth stage — Protect — you enable full DMARC protection for the domain.
Generally this would entail turning DMARC delivery policy to p=reject, which will instruct all DMARC-compliant servers on the Internet to reject all unauthorized emails pretending to come from your domain (i.e. forged, phishing emails).
The sampling tag p=X is removed from your DMARC records as well, which would make servers around the work reject all emails that fail DMARC checks.
Be sensible
Some domain admins may prefer to use p=quarantine (with pct=100, or no pct=X tag) to mean “protect”. The effect is slightly different in that with p=quarantine emails are still delivered to the user, albeit to spam/junk folders to keep them out of sight of users.
Some may prefer to use p=quarantine for a period just in case, changing to p=reject after some time without receiving any complaints.
You should be sensible to your domain usage. No matter if you use reject, quarantine, or switch between them, as long as you’re not sampling emails anymore, your domain is protected.
More protection — SPF and DKIM hardening
One last thing: SPF and DKIM are technologies older than DMARC. Because of that, many servers still do SPF and DKIM, but no DMARC checks.
To account for that, you should adjust your SPF and DKIM records to make them more strict too. On the stage 1 of the DMARC setup process we prepared the domain by changing the default SPF policy to ?all (neutral), and adding any new DKIM records in test mode (t=y).
Since now we’re confident that SPF and DKIM are passing for the senders we want them to pass, you should also change those records to more strict rules.
You do the above by changing the SPF default policy to -all, and removing any t=y from DKIM records.
By making your SPF and DKIM records more strict you increase the chances that those servers that do not support DMARC yet will reject forged emails.
Lastly, we go back to the DNS zone and adjust the TTL value of SPF, DKIM selectors, and DMARC records to a more network-friendly value.
The 5-Stage DMARC Setup process does not end when you enable the most restrictive DMARC policy. Making sure that your emails are being delivered as expected, and that an unnoticed mistake in a DNS record wouldn't disable your domain protection, is what will be looking into on the next stage.
Example.inc weeks four and five — protecting the domain
Given the importance of some emails sent by Example Inc. users, we decide to enable protection with quarantine, switching to a more strict reject policy after a few weeks with no report of emails going into spam/junk folders.
We then proceed to update the domain’s DMARC record and remove the pct=X tag. We want the final record to looks like this:
v=DMARC1;p=quarantine;rua=mailto:a-0-0-xyz@in.dmarcpal.comWe also change example.com’s SPF domain to make them more strict. Here’s the final SPF record:
v=spf1 ip4:192.168.81.122 ip4:192.168.67.47 ip4:192.168.8.220 -allWe did not add any new DKIM selector. If we had done that, we would also remove any t=y (test mode) flag from them.
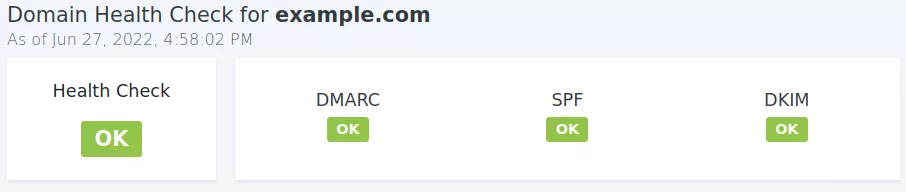
As always, after changing DNS records and waiting the TTL time, we go to DMARCPal’s console and run the Domain Health Check to make sure everything is okay in regard to SPF, DKIM, and DMARC records.
To our surprise, the domain check warns us that there is an issue with our DMARC record.
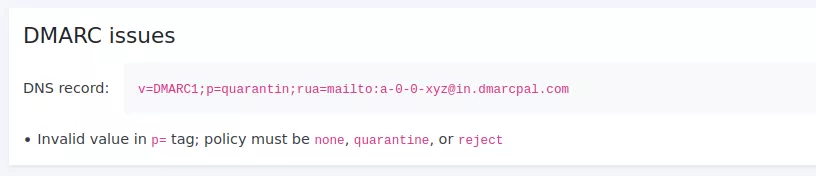
After inspecting the record carefully, we see that the policy tag (p=) is misspelled.
We quickly go back to the DNS host, and fix the record. We wait again for the changes to propagate, and run the Domain Health Check. This time we get an all green result for our DNS record.
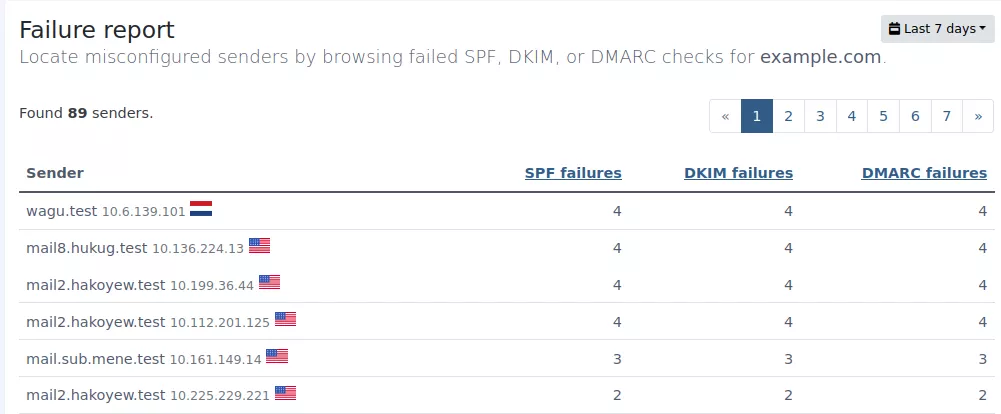
After the changes above, we start to monitor DMARC reports daily. The idea is to correct issues fast, in case any sender was missed in the previous stages. Although unlikely, a missed server could affect many users now, since DMARC’s strict policy is being applies to all emails.
To help with that we use DMARCPal’s Failure Report to rank top senders failing SPF, DKIM, or DMARC checks. Fortunately, the top failures are coming all from unknown addresses, so there’s nothing for us to do.
We leave the DMARC policy (p= tag) set to quarantine for a couple weeks. After no incidents being reported, we change the policy to reject.
This is the final DMARC record:
v=DMARC1;p=reject;rua=mailto:a-0-0-xyz@in.dmarcpal.comAfter changing the DNS zone, we run the Domain Health Check to ensure that all DNS records are in compliance. The check does not find any issues.
We’re ready for the final stage of the 5-Stage DMARC Setup process: monitoring.
Next: Stage 5 — Monitor